Create, edit, or delete an Expense Schedule
Create an Expense Schedule
-
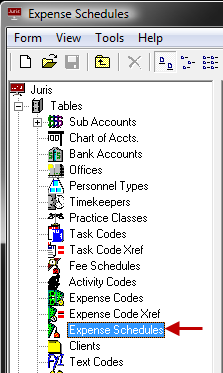
Select Tables > Expense Schedules.
-
Open a new Expense Schedule form by using any of the following options:
- Click the New icon on the toolbar.
- Select Form > New from the menu.
- Use the keystroke shortcut Ctrl + N.
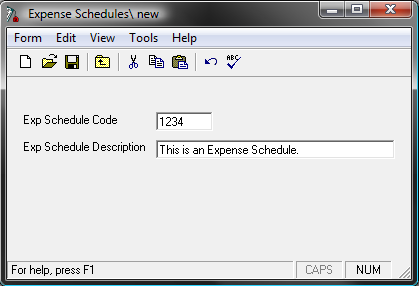
- In the Exp Schedule Code text box, type a 1-4 character code.
- In the Exp Schedule Description text box, type a 1 - 30 character description.
-
Spell Check the form using any of the following options:
- Click the Spell Check icon on the toolbar.
- Select Form > Spelling from the menu.
- Use the keystroke shortcut F7.
-
Save the schedule using any of the following options:
- Click the Save icon on the toolbar.
- Select Form > Save from the menu.
- Use the keystroke shortcut Ctrl + S.
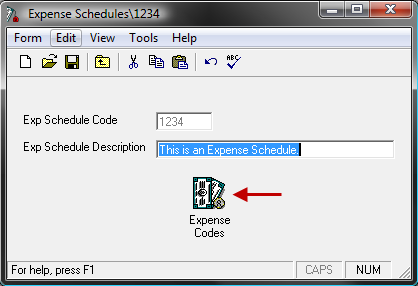
Once the Expense Schedule is saved, the Expense Code icon becomes available.
-
Click the Expense Codes icon to open the Expense Schedule details.
-
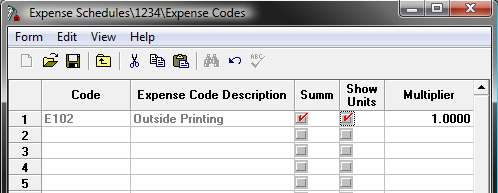
Enter an expense into the schedule in either of the following ways:
- Use the lookup button to select an expense code from the list of available expense codes.
-
Type the Expense Code into the Code column.
-
(Optional) Check the Summ check box for a line item to treat that item as a summarized expense.
Summarized expenses are shown on one line of the bill with a grand total for all items in the billing period, rather than being shown as a line-by-line item.
Example: Copy Expenses are an example of an expense that is often summarized.
-
(Optional) Check the Show Units check box for a line item if you want that expense to appear on the bill.
For items, such as copies that are charged a certain amount per unit, you would typically want to check this option (i.e., show units on the bill). Items where a per unit charge is equal to the total charged (postage, court fees, etc.), you would typically not check this option (i.e., don't show units on the bill).
-
In the Multiplier column, accept the default multiplier or type a new one. The multiplier value can be up to seven digits.
The multiplier defaults to 1.00 since many expenses are entered where a per unit charge is equal to the total charged. For example, court fees of $25.00 would be entered as Units = 25, Multiplier = $1.00, therefore Units x Multiplier = $25.00.
Items such as copies might have a multiplier of $.30. Therefore 10 copies could be entered and the system would automatically calculate 10 x $.30 = $3.00.
Note
The Units field must be included in the bill design for the Show Units option to be relevant. If the units field is not included in the bill format, then the units will not appear regardless of the setting.
-
Spell check the form using any of the following options:
- Click the Spell Check icon on the toolbar.
- Select Form > Spelling from the menu.
- Use the keystroke shortcut F7.
-
Save the schedule using any of the following options:
- Click the Save icon on the toolbar.
- Select Form > Save from the menu.
- Use the keystroke shortcut Ctrl + S.
Edit an Expense Schedule
- Select Tables > Expense Schedules.
-
Open the existing expense schedule using any of the following methods:
- Double-click on the schedule to be edited.
- Use the arrow keys on the keyboard to move through the list and select the schedule that must be edited, then hit the Enter key.
-
Make any necessary modifications desired to the form or the expenses on the expense detail spreadsheet.
Note
The system does not allow the code to be changed.
-
Spell check the form using any of the following options:
- Click the Spell Check icon on the toolbar.
- Select Form > Spelling from the menu.
- Use the keystroke shortcut F7.
-
Save the changes by using any of the following options:
- Click the Save icon on the toolbar.
- Select Form > Save from the menu.
- Use the keystroke shortcut Ctrl + S.
Delete an Expense Schedule
- Select Tables > Expense Schedules.
-
Select the existing expense schedule using any of the following methods:
- Double-click on the schedule to be deleted.
- Use the arrow keys on the keyboard to move through the list and highlight the schedule to be deleted.
-
Delete the selected expense schedule by using any of the following options:
- Click the Delete icon on the toolbar.
- Select Form > Delete from the menu.
- Use the keystroke shortcut Alt + F, D.
If the Expense Schedule is referenced elsewhere in Juris, the software does not allow the code to be deleted, and instead shows a message stating that the item may not be deleted. Otherwise, the system prompts "Are you sure you want to delete this item?"
-
Click Yes or press the Enter key to proceed with deletion.
Click No, or tab to the No button and press Enter to cancel.